Know Your Doctor Blades
Discover how doctor blades contribute to achieving exceptional print quality, along with key insights on proper installation and selecting the right blade for your application.
The essential part of achieving precise printing
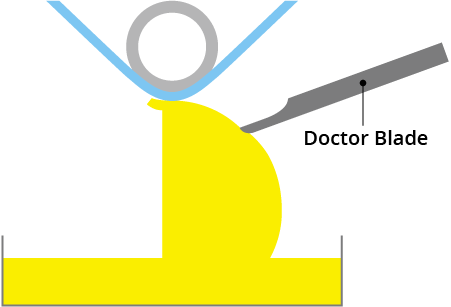
Doctor blades make direct contact with the anilox roller in printing presses to precisely remove excess ink or coating liquid. The material and shape of the blade tip must be selected based on the specific press and application. Choosing the optimal blade ensures consistent and high-quality printing results.

Choose the right doctor blade type that suits your needs
A doctor blade is an ink scraping blade that is mainly used in gravure printing, flexographic printing, and special coating processes. It is placed directly on the engraved roll of the intaglio plate to scrape off the ink that did not land on the recessed parts.
Since we select and manufacture the blade material and shapes suited for customers’ needs and site condition, our doctor blades are mostly made to order.
There are two main types of blade shapes; the one with a thin tip is called the “parallel blade”, also called “lamella”, “two-stage blade”, or “stepped.” It is the standard type currently used in approximately 80% of the sites in Japan. The thin and flexible tip of the blade allows for good ink cutting without strong pressure, and absorbs fine impacts to reduce printing defects. In addition, even if the blade gets worn out, the blade angle does not change easily, so it can be used for a long period of time.
The second type is the “stable” type, also known as “inclined blade” or “triangular blade”. It is a blade with an angle from the tip of the blade, and is now rarely used. Compared to the “parallel blade,” this type has more stiffness when pressure is applied to the doctor blade, and is recommended when strong pressure is required for scraping. As the blade wears out, frequent adjustment is required as the contact area with the plate increases.
We also perform advanced ceramic plating on doctor blades. It provides high wear and tear resistance, reduces burrs, and long-lasting durability. If you’re currently concerned about doctor quality, we highly recommend the ceramic coating treatment.

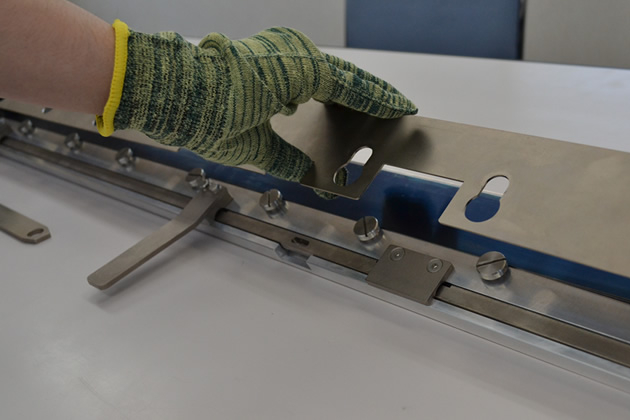
1. Setting on the doctor holder
Cut the doctor blade to the specified size and attach it to the doctor holder.
For safety, we recommend wearing cut-resistant gloves.
In most cases, a backup blade (backing plate) is also attached to the doctor holder. The backup blade prevents the doctor blade from excessive bending, improving scraping performance.

2. Fixing the doctor blade
The doctor blade is fixed by tightening the bolts placed at regular intervals to the same strength. If the tightening strength is inconsistent, it will cause waviness and affect the ink scraping performance. While tensioning the doctor blade, adjust the torque of the bolts to fix it.
The "FS One-touch Doctor Holder" that allows for fixing of all parts to equal strength is now available on the market.
 3. Setting on the machine
Set the doctor holder with the doctor blade set on the printing press.
The cutting edge of the doctor blade is extremely delicate. Handle it carefully so as not to scratch it during setting.
Material choices for all your printing requirements
Steel Doctor Hi-Blade®
Ceramic Doctor Hi-Blade®
Plastic Doctor® Blade
25+ Demos
And new ones with every update
110.000 Users
who trust Enfold with their site
24/7 Support
You got any issues? Get in touch!
12.000 Hours
of programming effort
4 Years of Updates
We aim for at least a decade!
500+ Options
To change the way your site looks